This is just a quick post to say that I've decided to move from Blogger to Wordpress. I've been milling it over for a while and I think it's worth doing now whilst my blog is still relatively new and the chance of me losing out on lots of SEO content is low.
Why am I moving to Wordpress? I just feel that it gives greater flexibility and will allow me to expand my blog out should I ever need to.
You can visit the new blog on www.stickypinny.co.uk
These posts will still be available to view for a while, but any further new posts will be available from Wordpress...
Ta!
S
Friday, 29 April 2011
Monday, 25 April 2011
Cakes for Japan Part Two
So the 23rd April quickly came around and Cakes for Japan Huddersfield was about to happen! I was tired, been baking for hours the day before, but was really looking forward to the day.

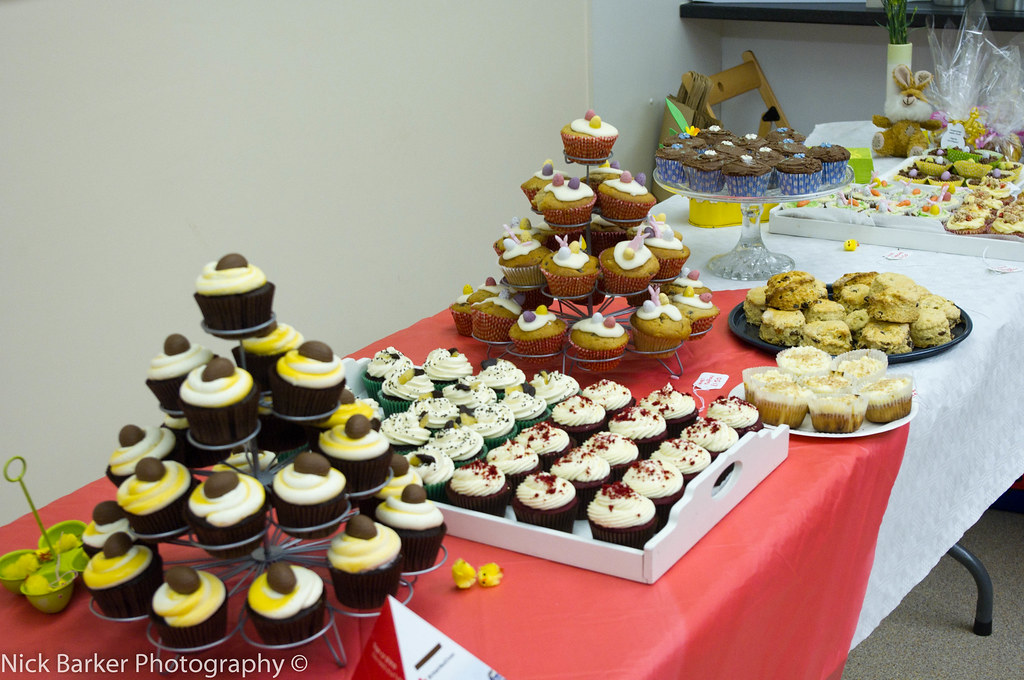


Everything had been set up by 9.30am and I was amazed by how great it all looked. Marie-Claire (@NouveauCakes) had done a great job with promotion, getting the bakers to bring their wares and getting the demonstration area in the market set up. Now all we had to do was get selling!
I think we were all concerned that people might not turn up and buy...the weather was glorious and we were in an indoor market! However, we needn't have worried. The people of Huddersfield came and bought cake - lots of it! Scones, flapjack, brownies, biscuits and cupcakes were flying out of the shop. Children came to have their faces painted and decorate biscuits too....
So how much did we raise? £892! an amazing result and I felt so pleased after finding out the final total. As I've mentioned in previous posts, all proceeds have gone to the British Red Cross Tsunami Appeal.
For more photos of the day, please see The Husband's Flickr album - he took some lovely shots of the day.
As I mentioned in a previous post, I decided to make 3 different types of cupcake:
Red Velvet
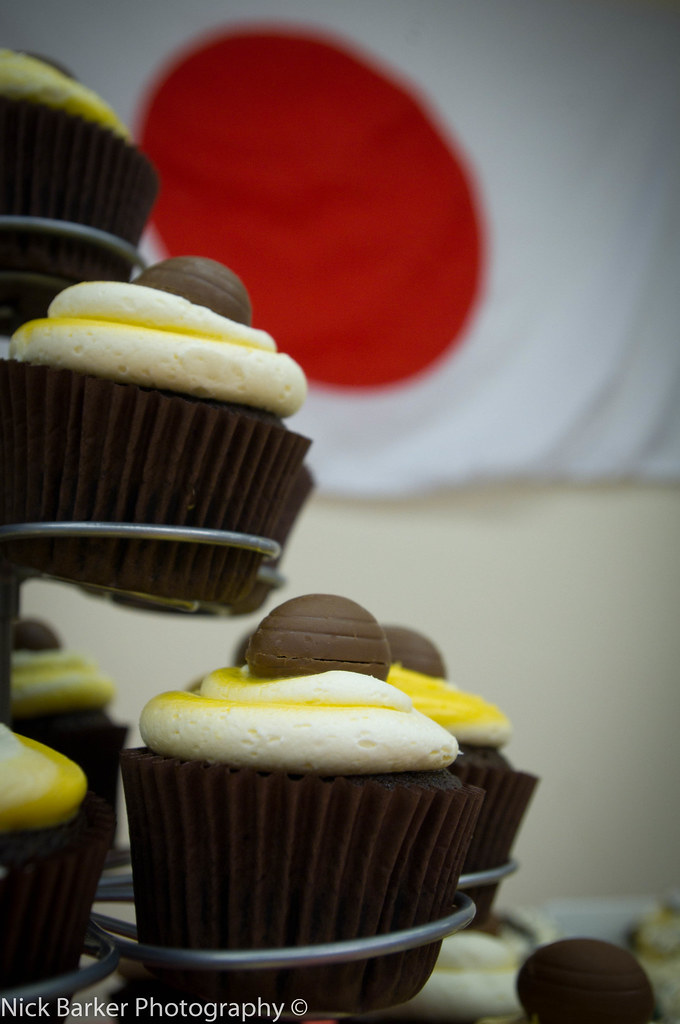
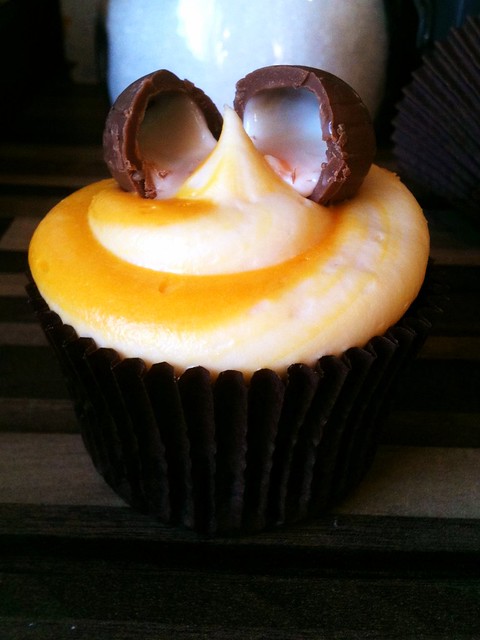
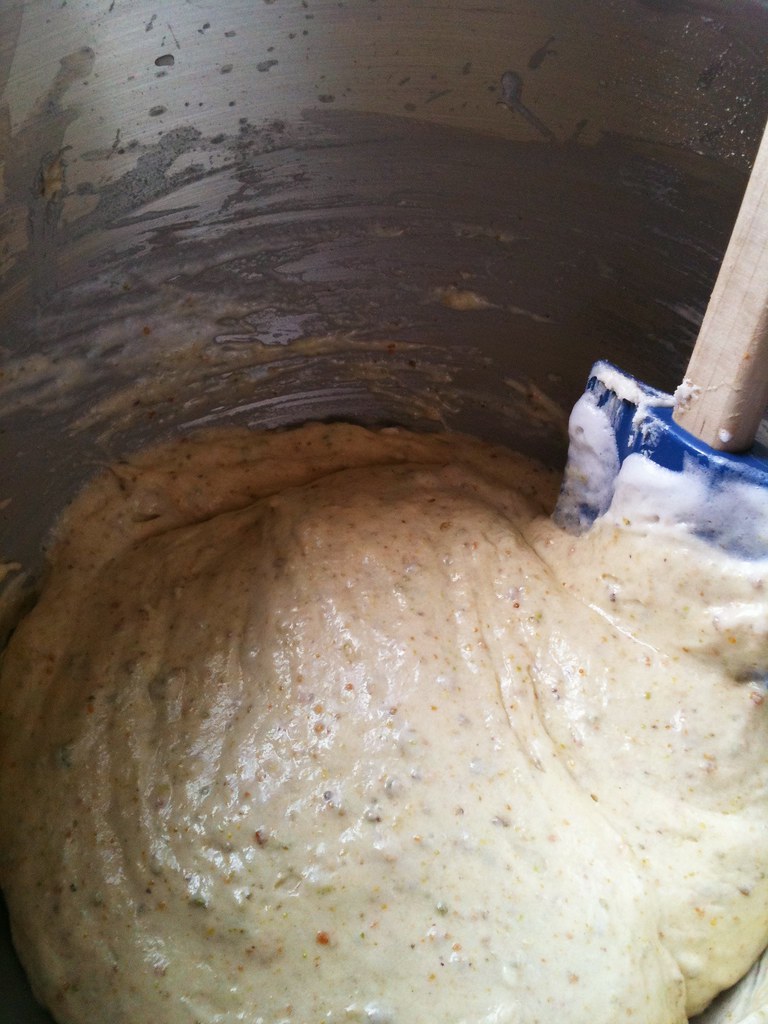
And because of the event, I really wanted to make a Japanese inspired cupcake, so I made chocolate, ginger and wasabi cupcakes. I wasn't sure whether Huddersfield would be ready for this combination, they were a slow burner, but they did sell! Recipe will follow in the next couple of days. It was a brilliant day with an even more brilliant result!
 |
| Chocolate, ginger and wasabi cupcakes |
Thursday, 21 April 2011
Please Support Cakes for Japan!
Just a quick post to big up the Cakes for Japan Huddersfield event which is happening on Saturday 23rd April!
Background info on how the events started can be seen in my Cakes for Japan Part One post, but please come along and show your support for the Red Cross and their efforts to help the earthquake victims.

The event has been brilliantly organised by Marie-Claire of Nouveau Cakes. She's rounded up a band of eager bakers through the power of Twitter and Facebook to provide an array of sweet treats for Huddersfield shoppers to buy.
Aside from bake sale itself, there will also be face painting Easter biscuit decorating for kids (and maybe adults if you fancy it!) and also raffles for some great prizes, so it's quite a family affair.
I'll be making an array of cupcakes. Flavours will be...
Background info on how the events started can be seen in my Cakes for Japan Part One post, but please come along and show your support for the Red Cross and their efforts to help the earthquake victims.
The event has been brilliantly organised by Marie-Claire of Nouveau Cakes. She's rounded up a band of eager bakers through the power of Twitter and Facebook to provide an array of sweet treats for Huddersfield shoppers to buy.
Aside from bake sale itself, there will also be face painting Easter biscuit decorating for kids (and maybe adults if you fancy it!) and also raffles for some great prizes, so it's quite a family affair.
I'll be making an array of cupcakes. Flavours will be...
- Red Velvet
- My Ironcupcake winning Creme Egg Cupcake
And a bit of an experiment, in which I am incorporating some Japanese ingredients.... details of which I will leave off here now, but if you want to try / know what it is, then come along on Saturday and buy some!
Other treats include:
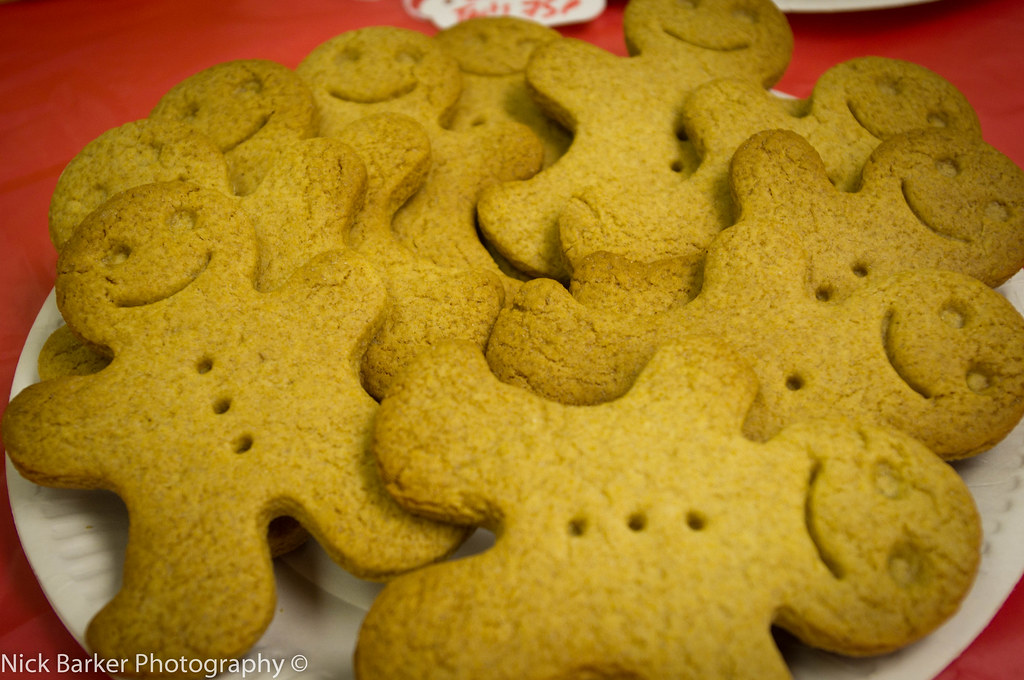
- Oaty and ginger biscuits
- Japanese flag Fondant Fancies
- Banana cake mini loaves with chocolate chips
- Mini chocolate tarts
- Madeleines
- Simnel buns
- Easter ginger biscuits
- Macarons
Marie-Claire will also be utilising the demonstration kitchen and making up fresh scones one site! Please come along and support if you can. We'll be there from 10am, at the demonstration zone in Queensgate Market!
A full blog update on the event will follow this weekend!
Tuesday, 19 April 2011
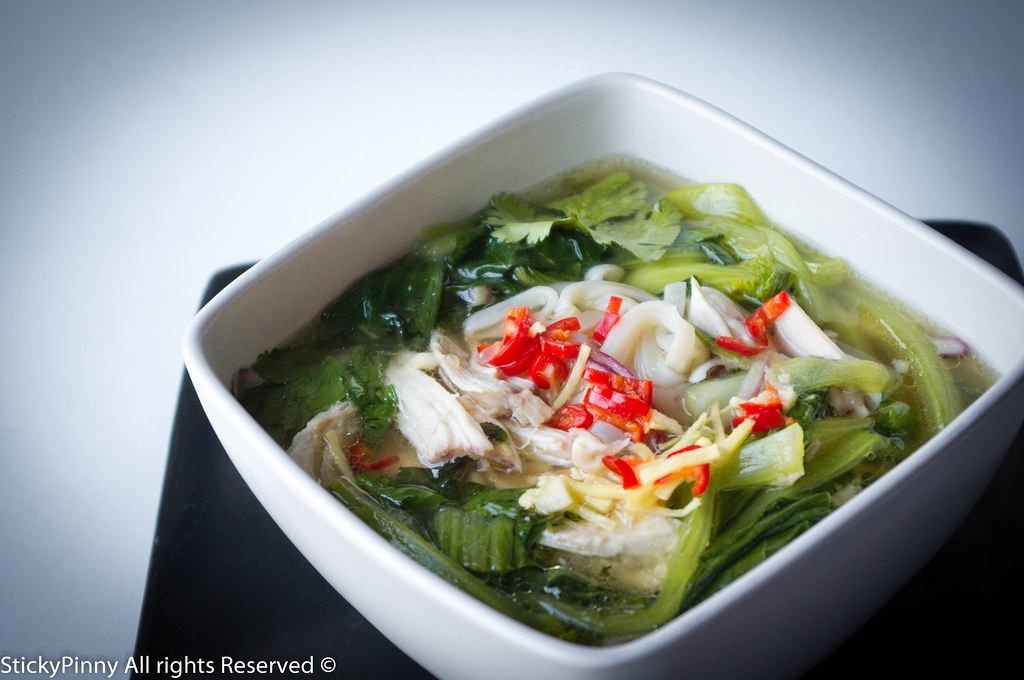
Chicken Pho Therapy
Safe to say that despite my efforts at having a relatively healthy week, my plans were scuppered by a few things.
- Clandestine Cake Club - I only ate a little bit of cake, honest!!
- Dinner and wine with friends.
- Barbecue
By Sunday I needed something, light and cleansing - something that as you eat, you can immediately feel that it's doing you some good. At times like these, for me, I rely on one thing - a chicken noodle soup.
But this isn't any old chicken soup, this is a pho ga, a Vietnamese chicken noodle dish, which does take time to make, but the results are wonderful. A light, clear broth which is carefully spiced but with a nice kick of chilli from the nuoc cham (a "dipping sauce" which is drizzled over the top of the dish.) This dish does take time to make, but best things comes to those and all that!
This recipe is adapted from Rick Stein's Eastern Odyssey and whilst I'm sure it's not 100% authentic, it's tasty as! I feel healthier by just looking at it!
Hanoi chicken noodle soup with bok choi (Pho Ga)
Adapted from Rick Stein (Serves 4-6)
Ingredients
1.5 kg whole chicken
A thumb sized piece of ginger, peeled and roughly chopped
1 onion, halved
5 cloves garlic, sliced
10 cm cinnamon stick
1/2 tsp black peppercorns
1 tbsp light soy sauce
3 large pak choi
400 g 1 cm-wide flat rice noodles
4 tbsp fish sauce
To Serve
8-10 spring onions, chopped (I didn't have any so finely shredded a red onion)
A handful of coriander, leaves picked
A sprig of mint, leaves picked and roughly chopped
Lime wedges
Nuoc Cham (See recipe below)
Nuoc Cham
1-2 long red chillies, roughly chopped (feel free to deseed if you don't want too much heat!)
1 garlic clove, peeled and chopped
1/2 inch of ginger, finely chopped
1 tbsp sugar
2 tbsp lime juice
2 tbsp fish sauce
1 tbsp rice vinegar
3 tbsp water
Stir all of the ingredients above in a bowl until the sugar dissolves. This will keep for about a week in the fridge.
Method
Put the chicken, ginger, onion halves, garlic, cinnamon, salt and peppercorns into a deep pan in which the chicken fits quite snugly. Cover with 2 litres of water. Bring to the boil, skimming off any scum as it rises. Lower the heat, cover and leave to gently simmer for 20-30 minutes. Turn off the heat and leave the chicken and stock to cool for 40-60 minutes.
Separate the stalks from the leaves of the bok choi and finely shred them lengthways. Cut the leaves across into 3 cm-wide pieces.
Lift the cooled chicken onto a plate and leave to cool. Drain the stock through a seive into a clean pan. Skin the chicken, pull the meat from the bones and break it into chunky pieces.
Bring a pan of unsalted water to the boil. Add the noodles, turn off the heat, cover and leave to soak for 10 min or until tender.
Bring the stock back to the boil, add the pak choi stalks and simmer for 2 min, then add the leaves and cook for a further 2 min. Then stir in the fish sauce.
Drain the noodles and divide among bowls. Top with cooked chicken, spring onions (or red onion) coriander and mint leaves. Ladle the steaming hot broth and bok choi over the top and spoon over the nuoc cham, and additional lime wedges on the side.
Feel cleansed and relaxed!
Sunday, 17 April 2011
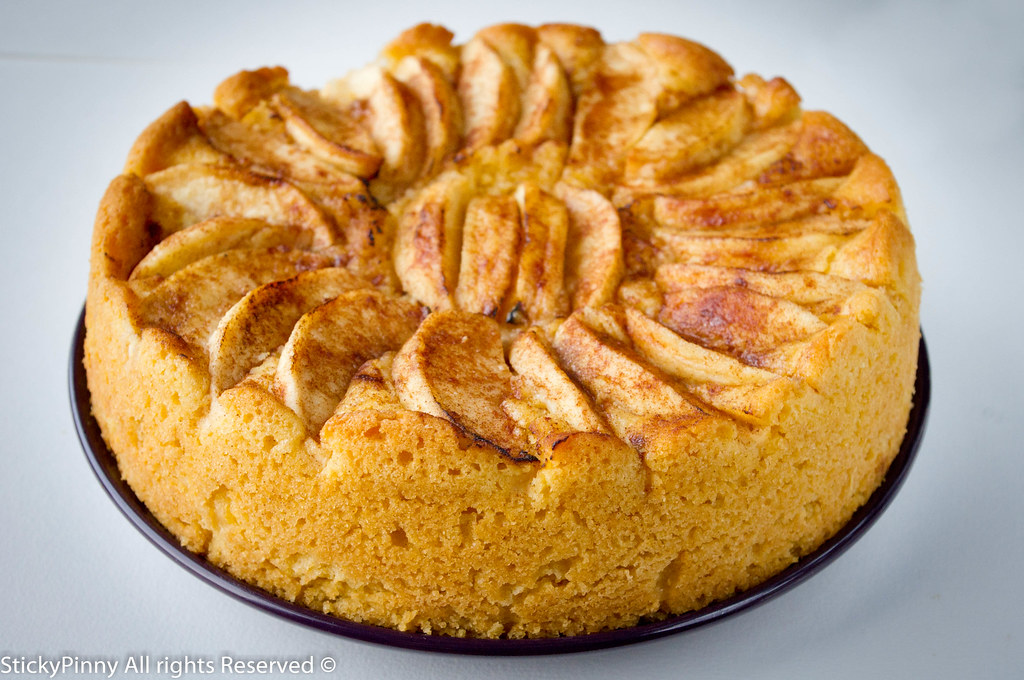
The First Rule about Cake Club....
Last Thursday marked my second trip to the Leeds Clandestine Cake Club, and what a treat it was! This time the event was held in the 4th floor cafe in Harvey Nichols. Again, another wonderful venue.
The theme for this month was "Vivaciously Victorian" and if I'm honest, I did struggle somewhat with deciding on a cake to make. So, in the vein of Heston Blumenthal, I decided to look to literary influences for inspiration, specifically Alice in Wonderland and the "Drink me Potion" which is said to have tasted of a
"Mixed flavour of cherry-tart, custard, pine-apple, roast turkey, toffee, and hot buttered toast"
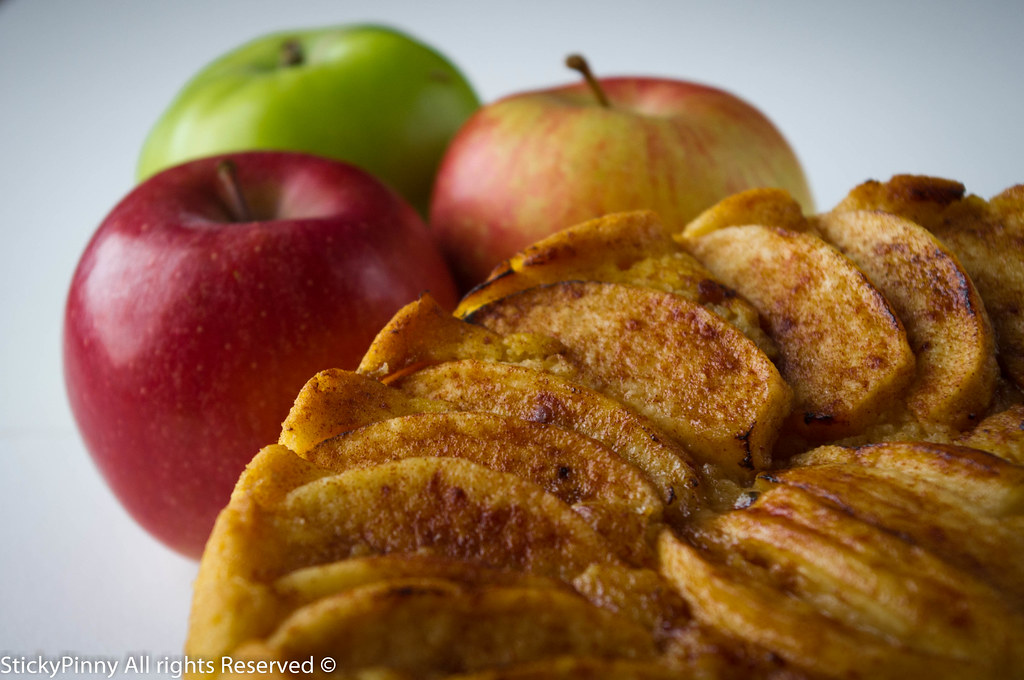
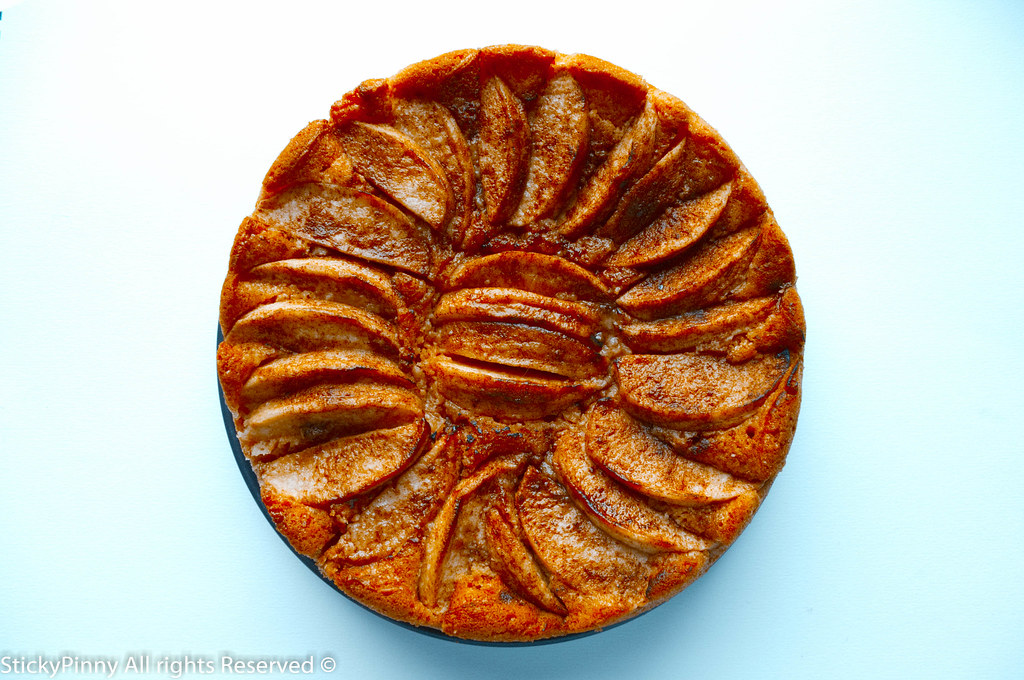
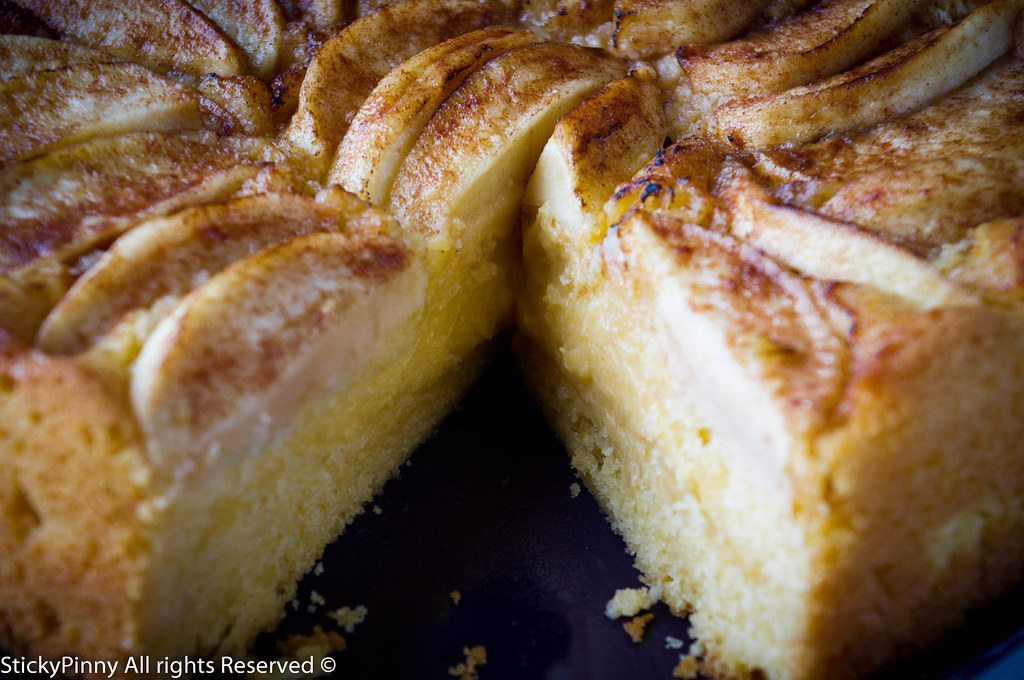
So for me, I definitely wanted to create a cake incorporating the combination of cherries and custard! I settled on the recipe, one where custard is baked into the middle of the cake. I was all set to bring a magnificent cake of gold and cherry red hues, wibbling and wobbling with with thick set custard... Only, I couldn't find any cherries. None, nada. I searched high and low, supermarkets, farm shops to no avail.
So I went for apple instead. Hey ho...but when I do get me some cherries I WILL make this cake again!!
For the cake:
200g soft butter
110g caster sugar
2 eggs
225g self raising flour, sifted
2 apples, peeled, cored and thinly sliced (I used Braeburn as I wanted the apples to keep their shape)
To top
1 tbsp butter, melted
2 tsp caster sugar
1 tbsp cinnamon
For the custard
In a saucepan and bring the milk to a simmer to a simmer over medium heat. Take off the heat.
Whisk the egg yolks and sugar in a small bowl until thick, add the flour and whisk until smooth.
Pour hot milk onto egg yolk mixture and stir until smooth. Return the contents to saucepan and stir over low heat until mixture comes to the boil.
Stir for 1-2 minutes until it becomes thick then remove from heat, stir in the vanilla and then cover with cling film and leave to cool in the fridge.
For the cake
Pre-heat the oven oven to 180C.
Beat the butter and sugar in a bowl until pale and fluffy.
Add the eggs, one at a time, beating well after each. Fold in flour.
Spread half the mixture into a springform 20cm greased and base-lined cake tin, be patient with this, the batter is very thick - it needs to be to encase the custard. It will take some effort to spread it evenly over the base of the tin.
Then add the cooled custard and smooth out evenly. Be sure to leave a of centimetre around the circumference of the cake uncovered by custard, as you want to seal the custard into the middle of the cake.

Add spoonfuls of remaining cake mix and spread carefully with a spatula to cover custard
Arrange apples on top of cake mixture and brush with melted butter. Sprinkle over the caster sugar and cinnamon.
Bake for about 60mins until cooked when tested with a skewer. Cool in pan before turning out.
Eat with extra cream if you like, but I think the custard adds enough moisture!

The theme for this month was "Vivaciously Victorian" and if I'm honest, I did struggle somewhat with deciding on a cake to make. So, in the vein of Heston Blumenthal, I decided to look to literary influences for inspiration, specifically Alice in Wonderland and the "Drink me Potion" which is said to have tasted of a
"Mixed flavour of cherry-tart, custard, pine-apple, roast turkey, toffee, and hot buttered toast"
So for me, I definitely wanted to create a cake incorporating the combination of cherries and custard! I settled on the recipe, one where custard is baked into the middle of the cake. I was all set to bring a magnificent cake of gold and cherry red hues, wibbling and wobbling with with thick set custard... Only, I couldn't find any cherries. None, nada. I searched high and low, supermarkets, farm shops to no avail.
So I went for apple instead. Hey ho...but when I do get me some cherries I WILL make this cake again!!
There was an amazing plethora of cake, ranging from Helen's sandcastle cake (a feart of engineering!), Jini's Empire Cake, Charlotte's Battenberg, ginger cakes and a number of variations on the Victoria sponge - all delicious! Needless to say it took me a few days to get over the sugar high! Again, eveyone who I got chatting to at the event were lovely, and I can't wait until the May event, which has a fruity, sweet or savoury theme.
The CCC also featured in an article in the Times the very same day, detailing how underground baking clubs and baking in general are gaining momentum in the UK. I have to say Lynn does an amazing job at organising these events and finding great venues to host them in!
I think my only quibble with the article was how it kind of pitched bake clubs as "anti cupcake" - yes, the CCC is all about "proper" cakes, but as someone who also loves cupcakes and attends Ironcupcake Leeds, I just think that there is a place for all types of baked goodies!! Let's just share the love for home baking!
Apple and Custard Cake
Ingredients
For the custard
280ml milk
3 large egg yolks
55g caster sugar
30g plain flour
2 tsp vanilla extract
280ml milk
3 large egg yolks
55g caster sugar
30g plain flour
2 tsp vanilla extract
For the cake:
200g soft butter
110g caster sugar
2 eggs
225g self raising flour, sifted
2 apples, peeled, cored and thinly sliced (I used Braeburn as I wanted the apples to keep their shape)
To top
1 tbsp butter, melted
2 tsp caster sugar
1 tbsp cinnamon
For the custard
In a saucepan and bring the milk to a simmer to a simmer over medium heat. Take off the heat.
Whisk the egg yolks and sugar in a small bowl until thick, add the flour and whisk until smooth.
Pour hot milk onto egg yolk mixture and stir until smooth. Return the contents to saucepan and stir over low heat until mixture comes to the boil.
Stir for 1-2 minutes until it becomes thick then remove from heat, stir in the vanilla and then cover with cling film and leave to cool in the fridge.
For the cake
Pre-heat the oven oven to 180C.
Beat the butter and sugar in a bowl until pale and fluffy.
Add the eggs, one at a time, beating well after each. Fold in flour.
Spread half the mixture into a springform 20cm greased and base-lined cake tin, be patient with this, the batter is very thick - it needs to be to encase the custard. It will take some effort to spread it evenly over the base of the tin.
Then add the cooled custard and smooth out evenly. Be sure to leave a of centimetre around the circumference of the cake uncovered by custard, as you want to seal the custard into the middle of the cake.
Add spoonfuls of remaining cake mix and spread carefully with a spatula to cover custard
Arrange apples on top of cake mixture and brush with melted butter. Sprinkle over the caster sugar and cinnamon.
Bake for about 60mins until cooked when tested with a skewer. Cool in pan before turning out.
Eat with extra cream if you like, but I think the custard adds enough moisture!
Tuesday, 12 April 2011
Nuts About Ironcupcake:Leeds
Following on from last month's post I did indeed enter April's Ironcupcake:Leeds competition. This month's theme was Nuts or Seeds. Usually when it comes to deciding what I am going to make, I tend to procrastinate - a lot! However, this one was different. I definitely knew I wanted to go down the nut route. I wasn't very inspired by seeds, lemon and poppyseed cakes aren't exactly Ironcupcake winning material, so nuts it was.
Out of all nuts, my definite favourite is the pistachio - from a flavour and colour perspective, so I knew this was what I wanted to incorporate into a cake.
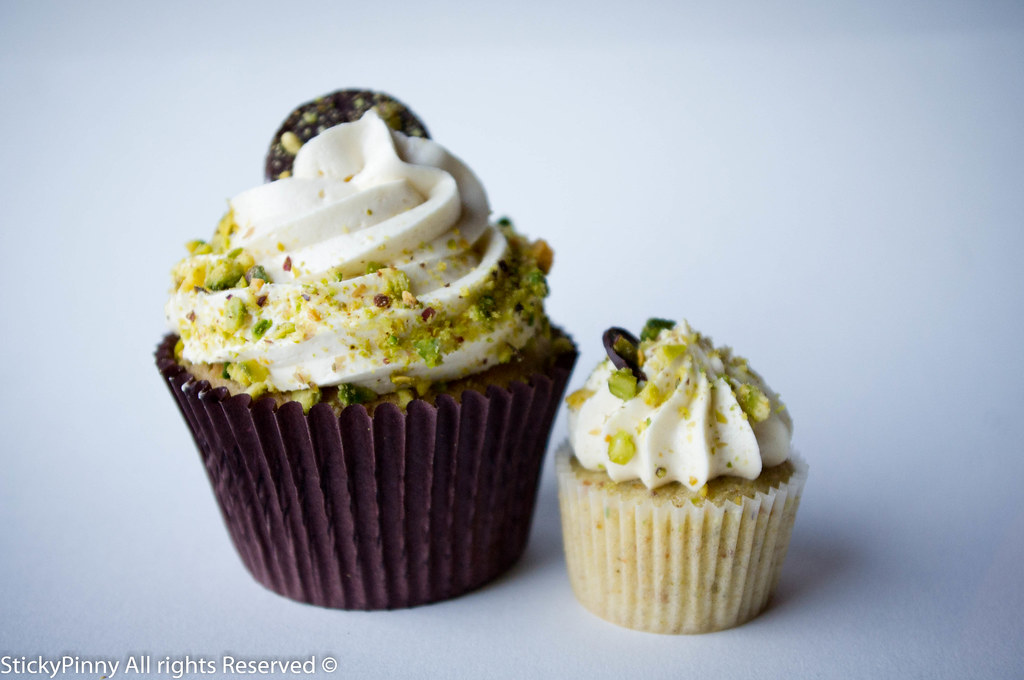

Out of all nuts, my definite favourite is the pistachio - from a flavour and colour perspective, so I knew this was what I wanted to incorporate into a cake.
Way before I started this blog, last year I actually made some lime and pistachio cupcakes I used a recipe from Eat Me! by Xanthe Milton... I remember them turning out a complete mess, sunken sad little things that I had to patch up with lurid bright green lime buttercream. According to the recipe "They may sink a little due to pistachios..." You're not wrong Xanthe, they were like craters! Taste wise, they were nice, with a nice smack of lime zest but the overall cake texture was quite greasy. The book itself is beautiful but as I have found out since, I'm not convinced with a lot of the cake recipes... Anyway, this isn't a book review, so I shall cease ranting!
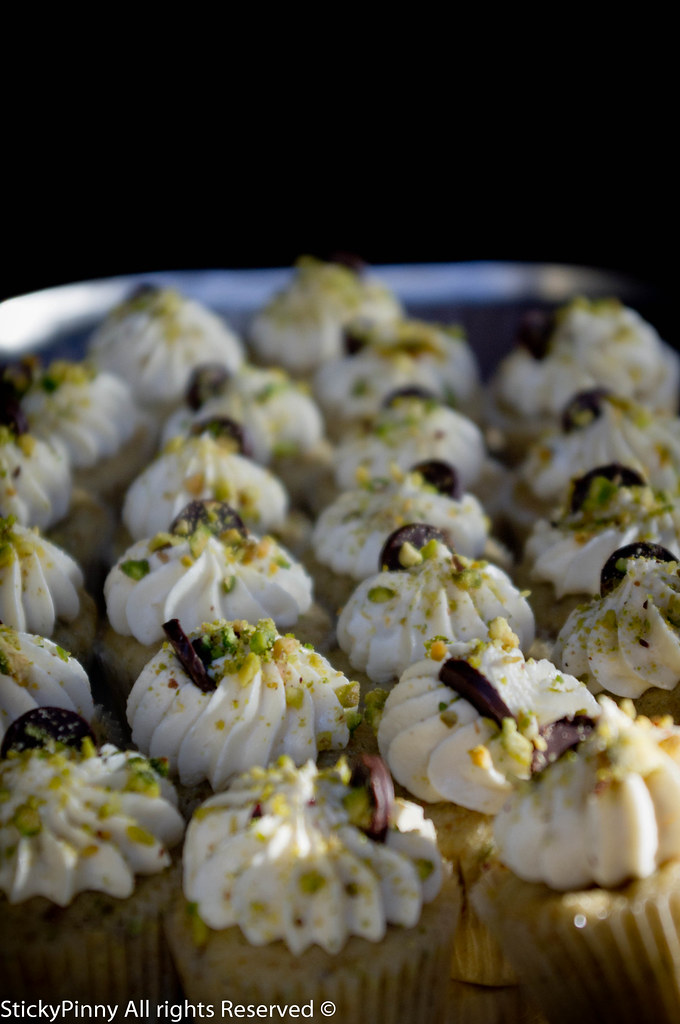
I definitely was not going to use this recipe as a basis for my cupcakes, but I wanted to use the overall flavour of lime with pistachio. After doing some research, I stumbled across this recipe from an American cookbook called Baked Explorations, entitled Aunt Sassy's Cake, which is a pistachio, honey and vanilla cake. I decided to give it a bash but substitute the vanilla for lime in the frosting. The main difficulty was converting the measurements into metric (I do have US cups, but I find weighing out the ingredients much easier / accurate) the linked recipe makes a huge amount of batter so have adapted it to make approx 18 cupcakes (I got 4 regular cupcakes and about 46 minis)
The cake recipe itself is all pretty straightforward, but with the addition of adding egg whites to the batter at the end to make the sponge really light and airy.
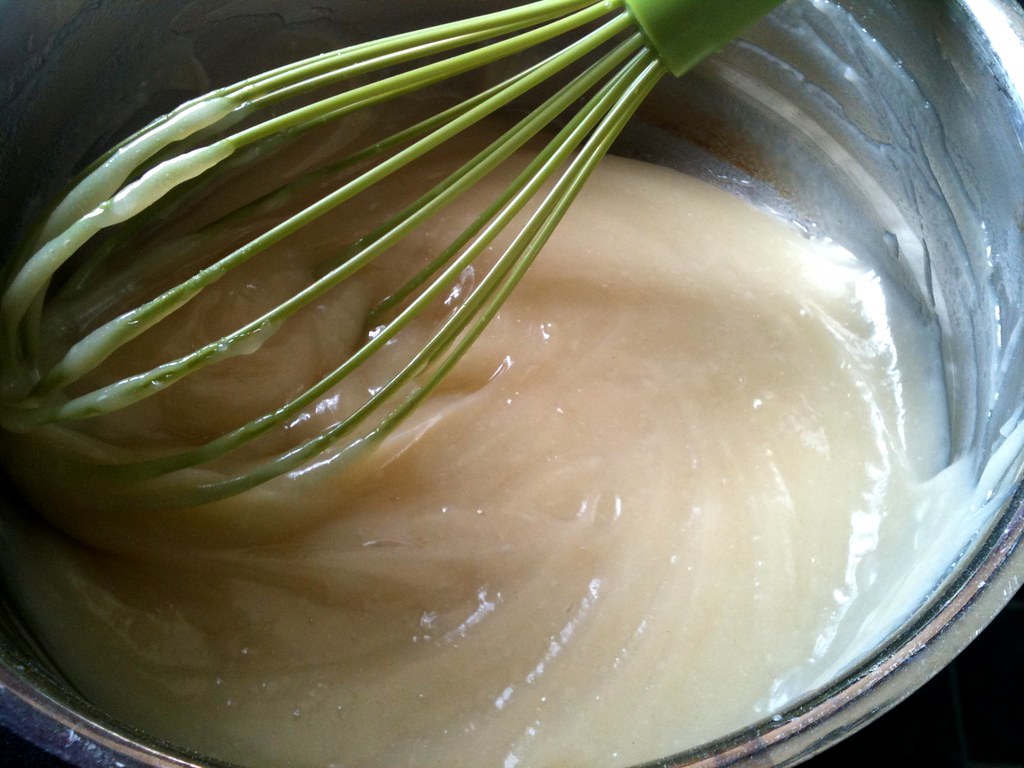
What really interested me was the recipe for the buttercream - it calls for the use of flour, more specifically a sweet roux which is then beaten with butter to create the buttercream. Sounds strange and unappetising, but I have to go all out there and say this is one of the most delicious frostings I have ever eaten. It's really light, not too sweet and has a really nice mouth feel. Although you could add more sugar if you desire, and very, very stable for piping. Plus, it avoids the mess of clouds of icing sugar. Bonus.
This method for making buttercream is quite common in the states, and is actually the traditional topping for Red Velvet cakes. Magnolia Bakery in NYC uses this frosting on their cupcakes. If you fancy something different then please do give it a try.
All in all I was pleased with the result, a nice light cake with a good proportion of nuts, you could definitely taste the pistachios coming through. The frosting was light and fluffy, with the flavours of honey and lime coming through, but without overpowering each other. A nice, understated cake.
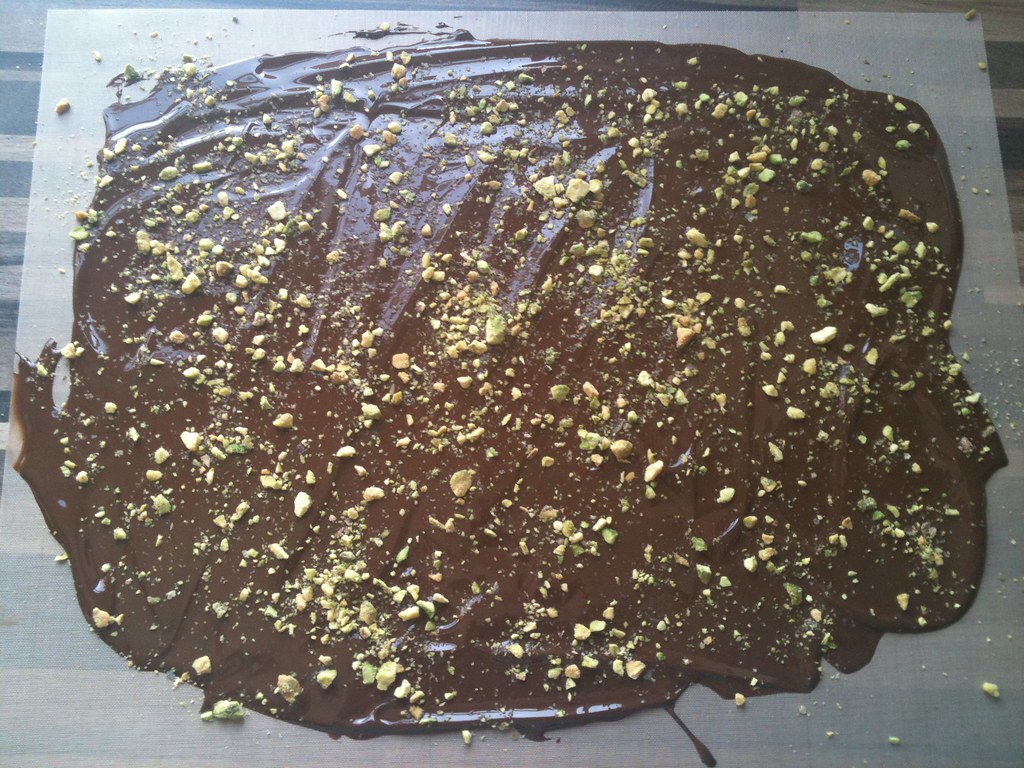
Decoration wise, I decided to use a simple swirl of buttercream and use chopped, bright green pistachios to sprinkle around the base of the cake. No bright green frosting here - I was after a classy look! However, I just thought that there was something missing, I just needed some further contrast, and something else that would add depth of flavour to the cake, so I set my mind on some bitter chocolate. In the end I made some pistachio "bark" which I cut out into discs to top off the cake.
 |
| Image Courtesy of www.ironcupcakeleeds.co.uk |
This month's event saw 11 entries in total - quite a few less than last month, which was surprising seeing as it was a free event for bakers and eaters this time around. Perhaps people weren't inspired by the theme, but I like challenging themes as I really think it gives bakers an opportunity to stretch themselves. I met a couple of lovely new bakers there too, Jo and Rebecca who made some lovely cakes - Cherry Bakewells, Ferrero Rocher and Hazelnut Latte. To have a peek at the other entrants then please view the Ironcupcake:Leeds website.
So how did I do? I won! Again! I was quite shocked because I don't enter the competition to win, I enter it to challenge and push my baking skills and experiment with new ideas, but I enjoy meeting new people and seeing what other people create too. Of course if I do come first it's a brilliant bonus and it spurs me on to create something better for next time I enter. Next month's theme is Fizzy Drinks - best get my thinking cap on, as I think it's going to be a popular one!
Pistachio Cupcakes with a Honey and Lime Frosting
(Adapted from Aunt Sassy's Cake from Baked Explorations) - Makes 18 Cupcakes
Ingredients
For the Cakes
60g shelled, unsalted pistachios
190g plain flour
1/2 tbsp baking powder
1/2 tsp salt
1/4 tsp bicarbonate of soda
60g unsalted butter , softened
60g vegetable shortening (I used Trex)
150g caster sugar, plus an extra 25g set to one side
1/2 tbsp vanilla extract
1 large egg at room temperature
175ml ice cold water
2 large egg whites , at room temperature
1/4 tsp cream of tartar
For the Frosting
150g caster sugar
35g plain flour
175ml whole milk
40ml double cream
175g unsalted butter, softened
2 tbsp honey
Finely grated zest of 1 lime
To decorate
Half a handful of crushed pistachios
For the Pistachio Bark
100g plain chocolate
1/2 tsp butter or shortening
A handful of crushed pistachios
Method
Pre-heat the oven to 170C and line a muffin tin with paper liners.
In a food processor or pestle and mortar, crush the pistachios until roughly chopped. Set aside a couple of tablespoons and then contunie to process the remaining pistachios just until finely ground.
Into a bowl, sift the flour, baking powder, salt, and bicarb into the bowl with the roughly chopped pistachios and the ground ones too.
In another bowl, beat the butter, shortening, vanilla and 150g sugar until light and fluffy. Then add the egg and mix well. Mix in a third the flour mixture, then half of the cold water, and then alternate until all flour has been mixed in.
In a clean bowl, whisk the egg whites and cream of tartar until foamy. Then add the 25g of sugar that was set aside earlier and beat until you achieve soft peaks - be careful not to overbeat. You then need to gently fold whites, a third at a time, into batter just until it is all combined. Do be careful not to knock out the air from the egg whites.
Divide between the muffin cups and bake for approx 20 minutes, but do check from around 18 mins. If you are making minis, then they will take about 10 minutes.
To make buttercream (warning, do not try and do this if you do not have an electric whisk!!)
In a medium saucepan, whisk sugar and flour until well blended. Add milk and cream and whisk until smooth. Stick the pan on a moderate heat and stir constantly with a heatproof rubber spatula, until mixture thickens and comes to a simmer, this will take about 5 minutes. Reduce heat to low and cook, stirring, for 2 minutes. Take off the heat and leave to cool completely. Be warned, it will look like PVA glue!
Beat the butter on medium speed until fluffy. Gradually beat in cream-flour mixture, beating until blended with butter. Continue beating until fluffy and smooth. This will take a good couple of minutes, it'll get to the stage where it has a similar consistency of whipped cream. Mix in the honey and lime zest. Refrigerate until you need to use it - beat again if it gets too cold in the fridge.
For the chocolate pistachio "bark"
Melt down the chocolate and butter, then spread over the base of a baking sheet covered in cling film. Scatter over the chopped pistachios and leave in the fridge until just about set. (About 15 - 20 mins).
Either break up the bark into shards or use a cutter to make decorative shapes to top off the cupcake.
Try not to devour the cakes all at once!
Saturday, 9 April 2011
Cakes for Japan Part One

One of the things I love about my work colleagues is that they're always willing to part with cash if it's for charity. If there is cake involved in exchange for money for charity, then even more so! A few colleagues had expressed their concerns about the devastating earthquake that affected Japan, so we decided to do something to raise some money for the Red Cross tsunami appeal. I mentioned the Cakes for Japan events, started off my Miss Cakehead, that had been taking place up and down the country and suggested we held our own mini Cakes for Japan bake sale.
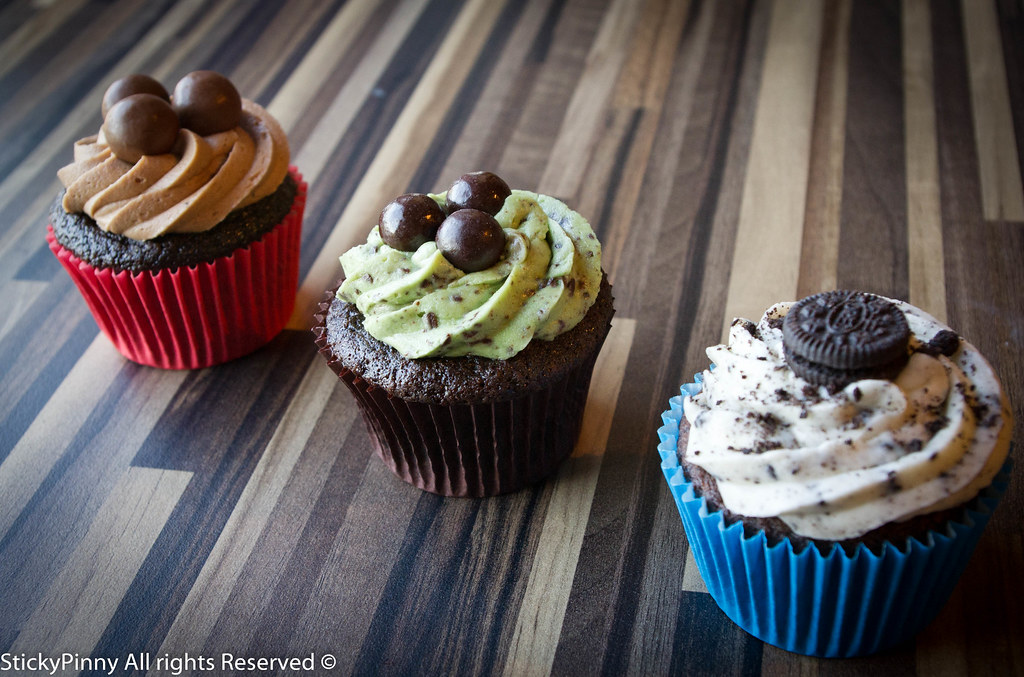
Now not wanting to be predictable, I obviously decided to make cupcakes. As I would be baking in the evening straight after work I wouldn't have much time to make wildly different varieties of cupcakes, so I decided to stick with making chocolate cake bases, then top with with different flavoured frostings.
After a while deliberating over which flavours to make, I settled on Malteser, Oreo and Mint Choc Chip, all which match perfectly with a chocolate cake.
I needed a pretty quick to make chocolate cake recipe, as I was intending to make 36 cupcakes plus minis, so decided to try out Martha Stewart's one bowl chocolate cupcake. The cake, as the name suggests, is made all in one bowl and uses the simple method of adding wet ingredients to dry. The whole process literally lakes a few minutes and there is no need to wait for butter and sugar to be creamed. If you want cupcakes fast, then this is the recipe for you!
All in all we made a total of £150 on the day. Luckily, work is going to match fund this so £300 will be winging its way to the Red Cross this week.
I am going to be baking and volunteering at Cakes for Japan Huddersfield, which is being organised by Marie Claire Nouveau Cakes, who I met at the last Clandestine Cake Club. Come along to the demonstration Zone at Queensgate Market on Sat 23rd April and help support the cause, buy buying lovely treats from a number of generous folk. See the website for more details.

One Bowl Chocolate Cupcakes (Makes 18)
Ingredients
220g plain flour70g cocoa powder
340g caster sugar
1 1/2 teaspoons bicarb of soda
3/4 teaspoon baking powder
3/4 teaspoon salt
2 large eggs
180ml warm water
180ml buttermilk
45ml vegetable or sunflower oil (or any oil that does not have a strong flavour)
1 tsp vanilla extract
Method
Preheat the oven to 180C / 350F (Fan 160C)
Line a muffin tin(s) with liners
Sift the flour, cocoa, bicarb, baking powder, sugar and salt into a large bowl.
Make a small well in the middle of the dry ingredients and then add the eggs, buttermilk, water, oil and vanilla and mix until all just combined and smooth.
Divide the batter between the cases, filling each no more than 2/3 full.
Bake in the oven for 18-22 minutes, rotating halfway if you need to. The tops should be springy - test with a cake tester to make sure they are done. Leave to cool in the pans for 5-10 mins, then turn out onto the cooling tray. (For minis, bake for 10 minutes).
Once cool they are ready to be topped with a number of different frostings.
Cookies & Cream (Oreo)
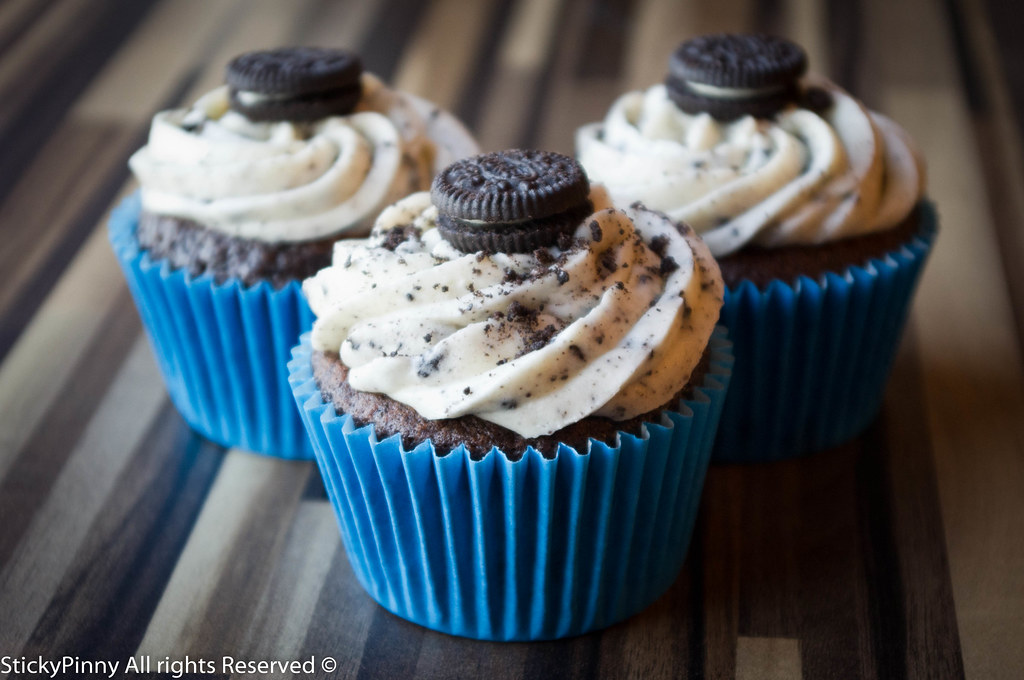
First off, just to mix this one up a bit, I actually baked half an Oreo into the bottom of this cake, so for these ones, I twisted off the tops of some Oreos and placed the half with the biscuit filling, filling side up, in the bottom of the liner before adding the cake batter and baking for the time specified above.
The frosting is essentially a cream cheese frosting, with the addition of a few of the leftover Oreo halves crushed, then foled through at the very end. It's important that you don't add the crumbs until the end, other wise you'll end up with grey frosting. Not attactive!
Ingredients
100g unsalted butter (room temp)
600g icing sugar
200g full fat cream cheese
4-5 oreo halves, crushed
Method
Beat the butter and icing sugar until mixed well - this may take a few minutes. Then add the cream cheese and beat slowly until soft and fluffy. Throw in the crushed Oreos and carefully fold in. It's then ready to be used to top the cakes. I topped the cakes off with a mini Oreo.
I did have an issue with the Oreo half sticking at the bottom of the liner, so next time will add the Oreo after adding a spoonful of batter to the liners.
Malteser Cupcakes
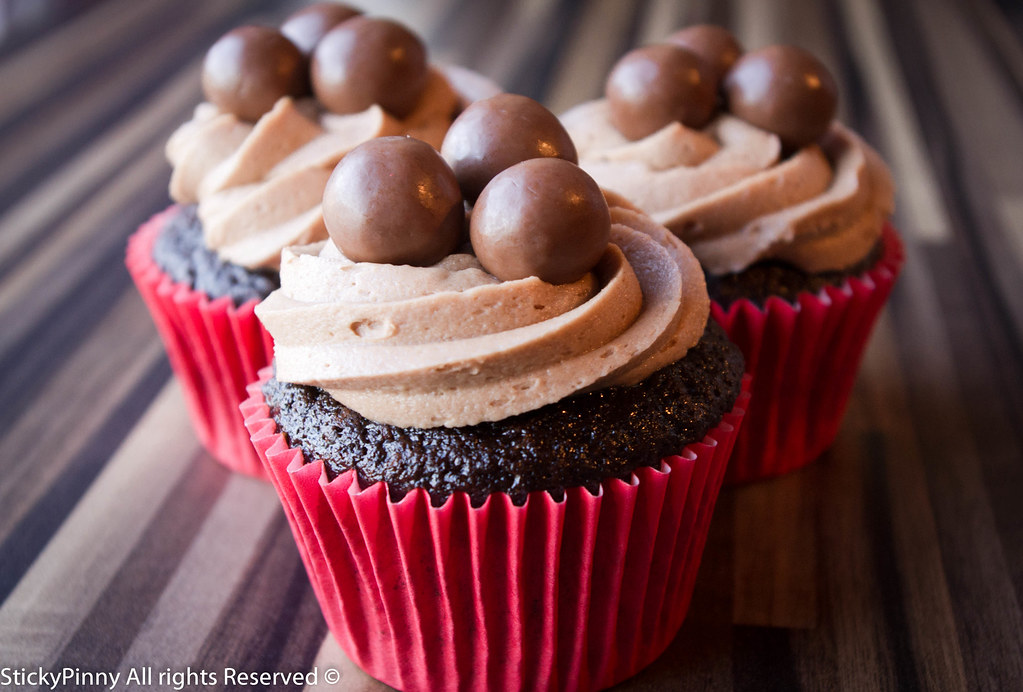
The recipe for the frosting can be found on a previous Malteser cupcake post.
Mint Choc Chip
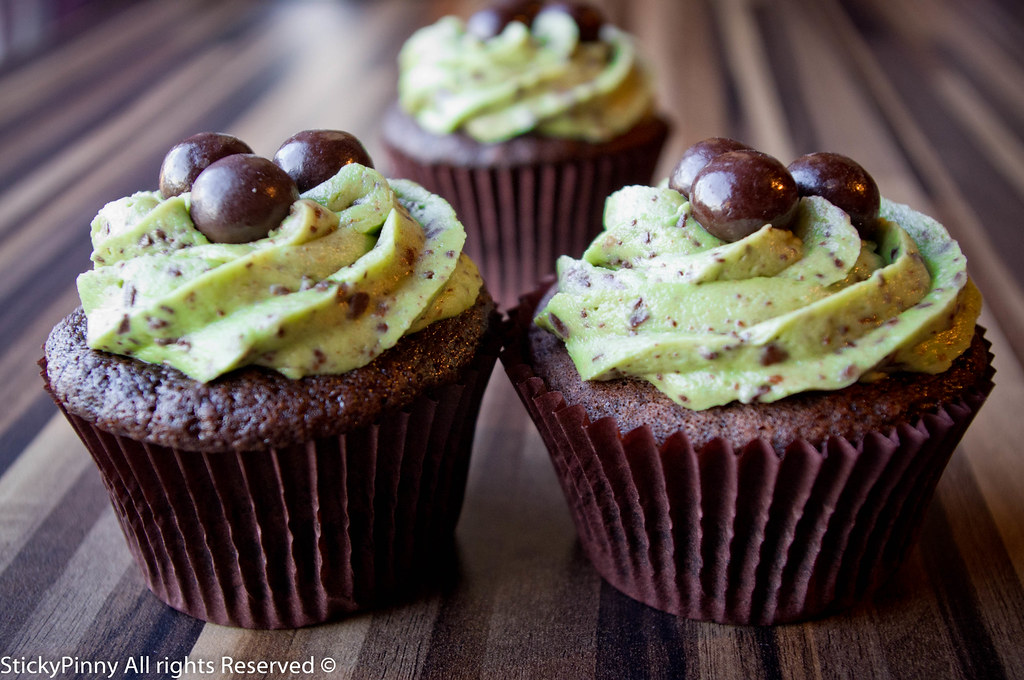
Rather than messing around with chopping chocolate and peppermint extract, I just made up a batch of buttercream and then added a box of chopped up After Eight mints. The beauty of this frosting is that the longer you leave the buttercream, the more the mint flavour seems to infuse through. However, feel free to add grated chocoalte and creme de menth instead if you don't like the idea of using a whole box of After Eights.
Ingredients
150g unsalted butter
500g icing sugar
50ml milk or cream
300g box of After Eights
Green food colouring (optional)
Method
Beat the butter, icing sugar and milk until mixed well - this may take a few minute, until soft and fluffy. Add a few drops of food colouting (if desired) and mix until you get a nice mint shade. Throw in the chopped After Eights and carefully mix through throughly. It's then ready to be used to top the cakes. I decorated the cakes with some Poppets which I found in the supermarket.
I won't be making these flavours for Huddersfield Cakes for Japan - keep your eyes peeled to see what I make next, or come along on the 23rd, support us and see for yourself!
Thursday, 7 April 2011
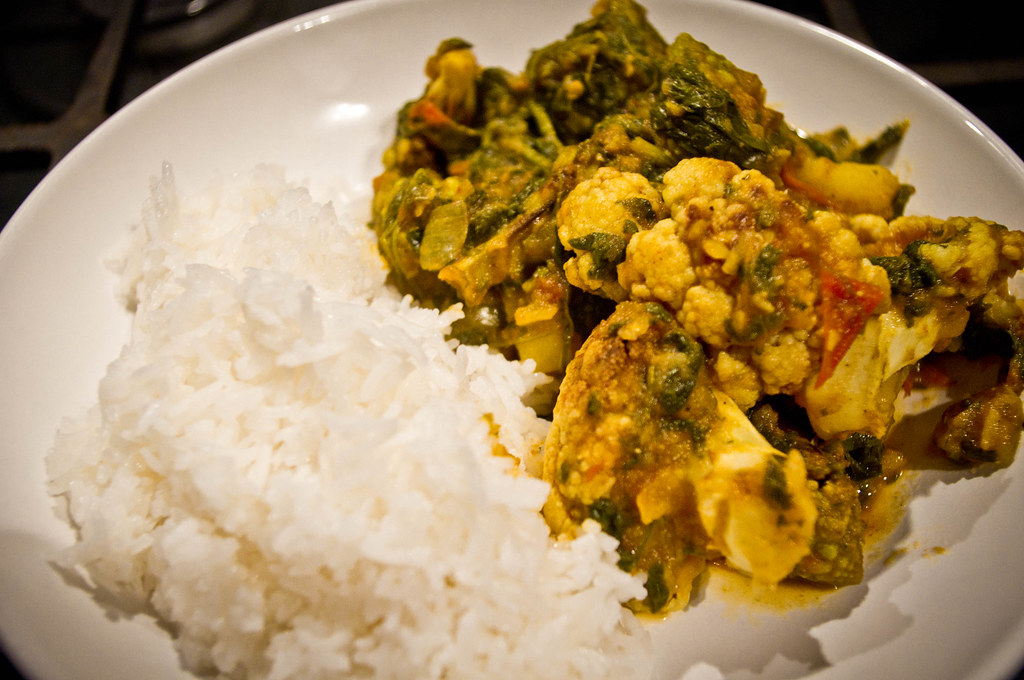
Roasted Gobi with Aloo Saag Curry
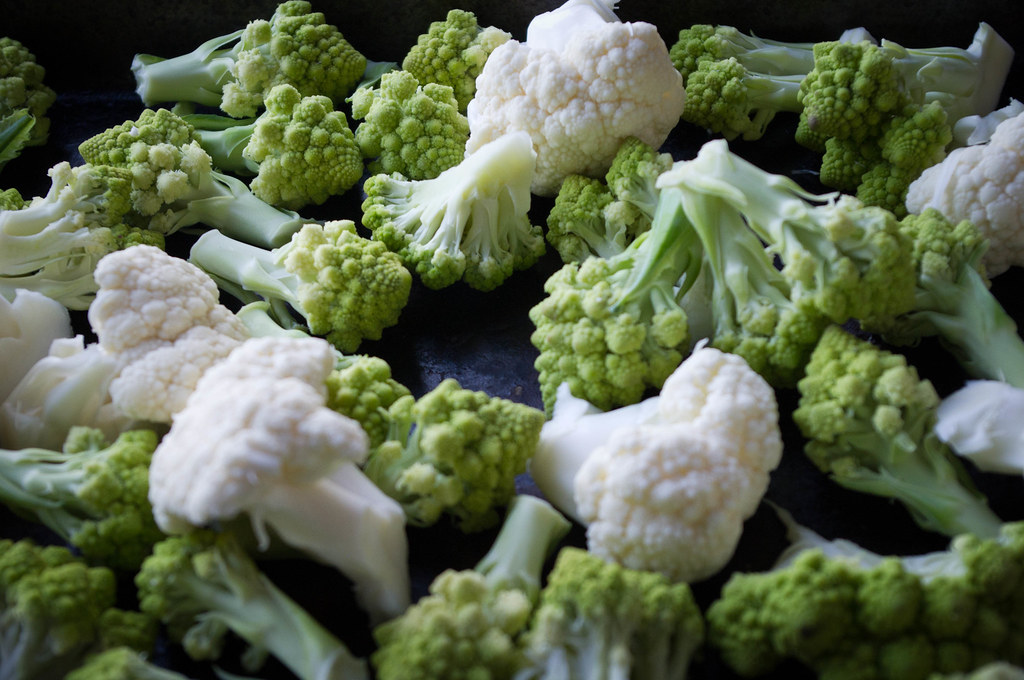
The Husband and I took a trip to our local farm shop the other evening and staring at me were some beautiful looking Romanescos. Lime green in colour with cone shaped florets, it really is an attractive looking vegetable. A member of the brassica family, it seems to sit somewhere in between a broccoli and cauliflower.

I've never actually cooked with Romanesco before, mainly because I have never come across them in the supermarket / shops. However, this is not for lack of trying to find one. Funnily enough, the appearance of this vegetable in my local shop does coincide with the Great British Food Revival series on BBC2. In the first episode, the Hairy Bikers did their bit to campaign for the resurgence of the humble cauliflower, which is often overlooked in favour of broccoli. From that episode, I was really excited by their Saag aloo with roasted gobi curry. As much as I am a huge carnivore, I do have a love for veggie curries.
The star of the curry is the cauliflower, which if first roasted off in the oven for 20 mins. Now cauliflower is not a vegetable I would ever think of roasting, but it seems to bring out the most amazing nuttiness which transfers well into the curry.
However, I didn't follow their recipe to the letter, I have issues with too much fat in my food, (cakes of course are an exception, but come on - I've got to cut back somehow!) plus I didn't have all of the ingredients in my pantry, so this is my take on Dave and Si's recipe.
The dish has bags of flavour and texture and really leaves you feeling satisfied without the heavy feeling of a meat curry. The roasting of the cauliflower really adds depth to the dish. Definitely one I will be making again!
Roasted Gobi and Aloo Saag Curry
Ingredients
For the roasted cauliflower
1 small romanesco
1 small cauliflower
A drizzle of olive oil
Salt & pepper
For the Aloo Saag Curry
1 large onion
2 cloves of garlic, finely chopped
1 green chilli - up to you if you remove or keep the seeds, finely chopped
1 inch piece of ginger, finely chopped / grated
1 tsp ground cumin
1/2 tsp turmeric
1/2 tsp ground coriander
1/4 tsp cinnamon
1/2 tsp fenugreek
3 potatoes, peeled and chopped into inch cubes
4 large tomatoes, chopped
250g bag of spinach leaves, washed
50ml water
Lemon juice
1/2 tsp Garam Masala
To serve
Basmati rice
Preheat the oven to 180C/350F/Gas 4.
Break up the two cauliflowers into bite-sized florets and place into a baking tray. Drizzle with olive oil and season with salt and freshly ground black pepper. Roast for 20 minutes, or until golden-brown. Ideally you want a bit of crunch still to the cauliflower, as it will add texture to the finished dish. Set to one side.
For the curry, fry off the onion in a pan until softened, about 3 mins. Add the chilli, garlic and ginger, then add the powdered spices (with the exception of the garam masala). Keep stirring for about a minute or two so that the spices do not burn, add a drop of water if you find the pan sticking.
Add the potatoes and coat in the onions and spices, then add the tomatoes, spinach and water. When you add the spinach, put the lid on the pan and wait for the spinach to wilt, as it will be an impossible task to try and stir everything before this point, the spinach will be everywhere!
Leave to simmer for about 20 minutes, stirring occasionally, or until the potato is cooked through. There should still be a bit of liquid in the pan at this point, but this is fine, as the cauliflower will absorb this.
Add the cauliflower to the pan and then season to taste. Add a squeeze of lemon juice and the garam masala. Stir through and it is ready to serve with basmati rice. I think a tomato, onion and coriander salad would be a nice refreshing side to go with it also.
Let's support the cauliflower!
Sunday, 3 April 2011
Wedding Bells
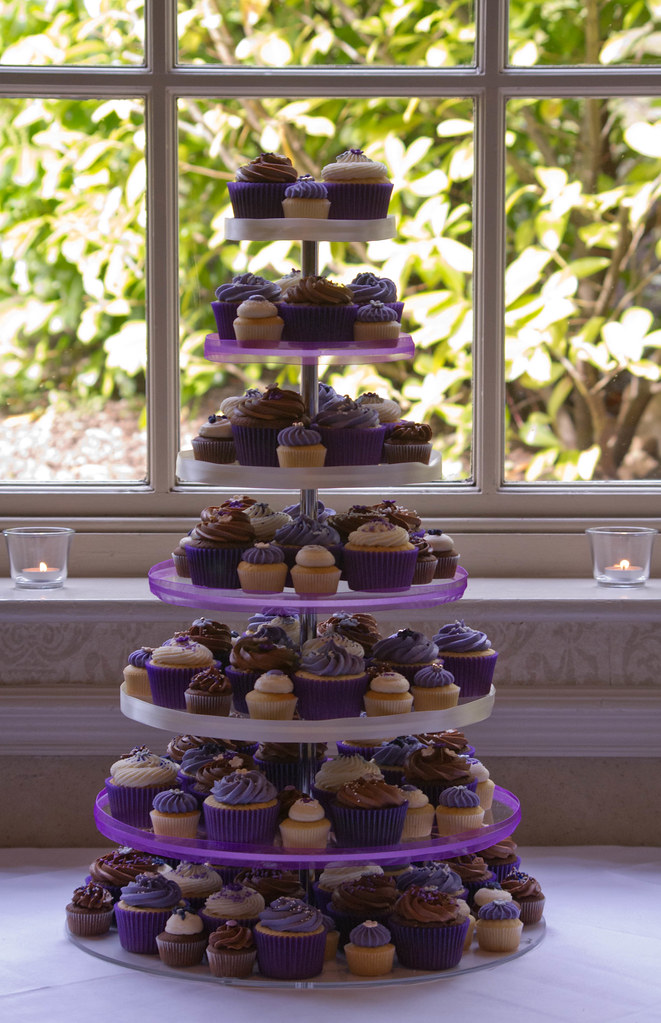
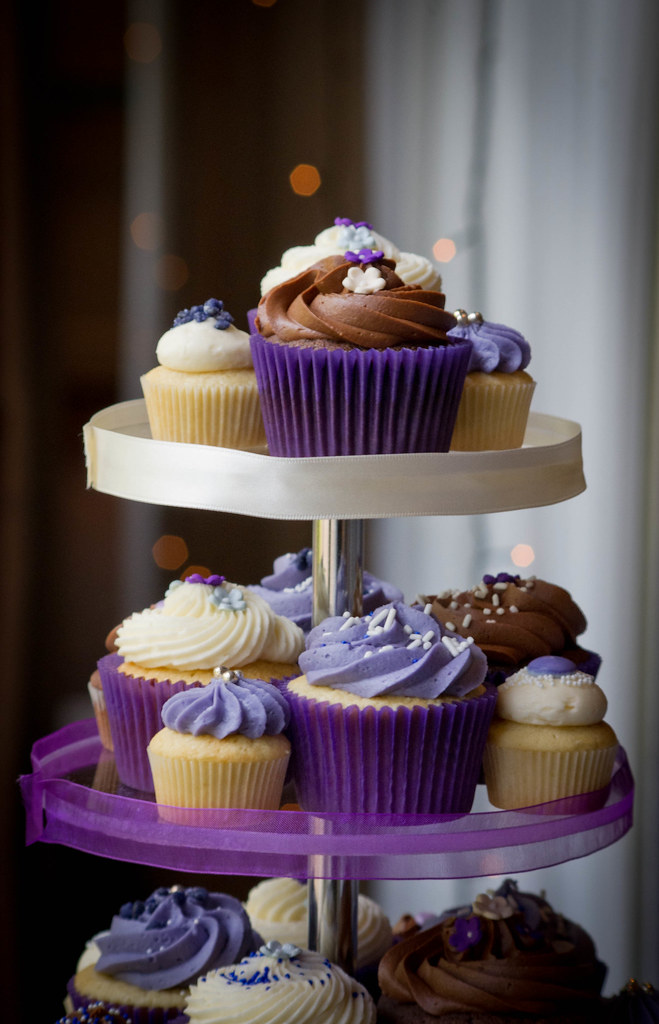
This weekend marked my first ever attempt at creating cupcakes for an event - a wedding. However, the bride is also my boss. So no pressure there to try and make the cupcakes even more perfect!
Luckily, I wasn't really given a brief as such - the Bride wanted a mixture of standard and mini cupcakes and decided to stick with the simple flavours of vanilla and chocolate. The colour theme for the wedding was purple, so other than that I pretty much had free reign.

Rather than create a tower of uniform cupcakes, I wanted to bring in some different looks and textures, to create a bit of a vintage tea party feel to them. So i decided to use different piping swirls, colours for the vanilla cakes and also decorative touches. A bit unconventional if you like, which I really thought tied in to the bride's personality. The wedding itself was beautiful, and I was really pleased I could help be a part of it.
Seeing as this was the first time I was creating cakes for a large number, I had to be prepared. A really good blog post I read up on can be found here on Cupcake Bake Shop which really helped on hints and tips on baking in bulk.
I won't go into the recipes for either of the cakes, as they were just simply vanilla and chocolate, which can be easily found.
I spread the baking out over 2 days - the first I got the kitchen organised and made up the frostings, they keep well for up to a week in an airtight container. The second day I got down to the business of baking the cakes.
The cakes overall didn't take too long to bake - all in all they were completed in 6 hours. that was including an absolute baking fail where I accidentally had the oven at the wrong temperature, resulting on overflowed, sunken cakes! However, apart from this hurdle I think the whole process went really smoothly but I am under no illusion that this is due to the fact I am very lucky and have a Kitchenaid mixer, and also 2 ovens which makes things much much easier.
The most nerve wracking part of the process was transporting the cakes - I was so paranoid that the cakes would be ruined every time we went over a bump or hole in the road!

I think the overall response to the cakes was a good one! I saw a few people taking them home with them too at the end of the night and I got a few compliments too - but of course the cakes weren't the star of the show, that accolade went to the Bride!
Creating 100+ cakes was a challenge but one I enjoyed. The fact I was given the freedom to be creative with the design was a bonus too! I felt slightly on edge throughout the ceremony and up until the point of the wedding breakfast - the Bride had no idea what the cakes were going to look like until the day, so once I had seen she was happy with them, I could kick back, relax and have a drink!
Cheers Mr & Mrs L - here's to a long, loving marriage!
Luckily, I wasn't really given a brief as such - the Bride wanted a mixture of standard and mini cupcakes and decided to stick with the simple flavours of vanilla and chocolate. The colour theme for the wedding was purple, so other than that I pretty much had free reign.
Seeing as this was the first time I was creating cakes for a large number, I had to be prepared. A really good blog post I read up on can be found here on Cupcake Bake Shop which really helped on hints and tips on baking in bulk.
I won't go into the recipes for either of the cakes, as they were just simply vanilla and chocolate, which can be easily found.
I spread the baking out over 2 days - the first I got the kitchen organised and made up the frostings, they keep well for up to a week in an airtight container. The second day I got down to the business of baking the cakes.
The cakes overall didn't take too long to bake - all in all they were completed in 6 hours. that was including an absolute baking fail where I accidentally had the oven at the wrong temperature, resulting on overflowed, sunken cakes! However, apart from this hurdle I think the whole process went really smoothly but I am under no illusion that this is due to the fact I am very lucky and have a Kitchenaid mixer, and also 2 ovens which makes things much much easier.
The most nerve wracking part of the process was transporting the cakes - I was so paranoid that the cakes would be ruined every time we went over a bump or hole in the road!
I think that overall I was pleased with how everything turned out. Unfortunately I am very very self critical and kept thinking I should have done one thing or another differently, that they could be better. The Husband soon knocked that out of me though! Speaking of the Husband, I really have to thank him for the beautiful pictures he took - think they made the cakes look better than they actually were. You can see more of his stuff on his blog.
Creating 100+ cakes was a challenge but one I enjoyed. The fact I was given the freedom to be creative with the design was a bonus too! I felt slightly on edge throughout the ceremony and up until the point of the wedding breakfast - the Bride had no idea what the cakes were going to look like until the day, so once I had seen she was happy with them, I could kick back, relax and have a drink!
Cheers Mr & Mrs L - here's to a long, loving marriage!
Subscribe to:
Posts (Atom)
